Contents of This Page
Using the List
- List Panel Overview
- The List Is an Outline
- Row Menus for Adding, Moving and Editing Parts
- Three Types of Row Menus
- Add and Edit Rows
- Move Parts
- Special Move and Copy Actions in Planning Stage
List Panel Overview
The List panel is used for capturing information during the Session.
The List is used in all the Main Cycle Activities.
▪ All information on the Map is shown on the List
▪ Map parts can be added to the List, and they will appear on the Map
▪ Comments about Map parts are also captured on the List
▪ All prioritizing is done on the List
▪ All brainstorming is done on the List
▪ All Action Plan building is done on the List
For an overview of the List format, please see "List Panel" on "Main Page Overview".
Different variations in the List are described in the Activities page of this Help documentation.
The List Is an Outline
▪ All versions of the List take the form of an outline, with all rows having "parents" and possibly "children" and "siblings".
▪ There are many variations in outlines in the List. Here are a few examples:
|
▪ Central Process Name ▪ Left Map Column (left side of map) |
▪ Change Plan Header ▪ Change Plan Header
|
| So: adding and moving parts on the List is like adding and moving rows in an outline. |
Row Menus for Adding, Moving and Editing Parts
▪ All parts on the List are added, moved and edited using row menus
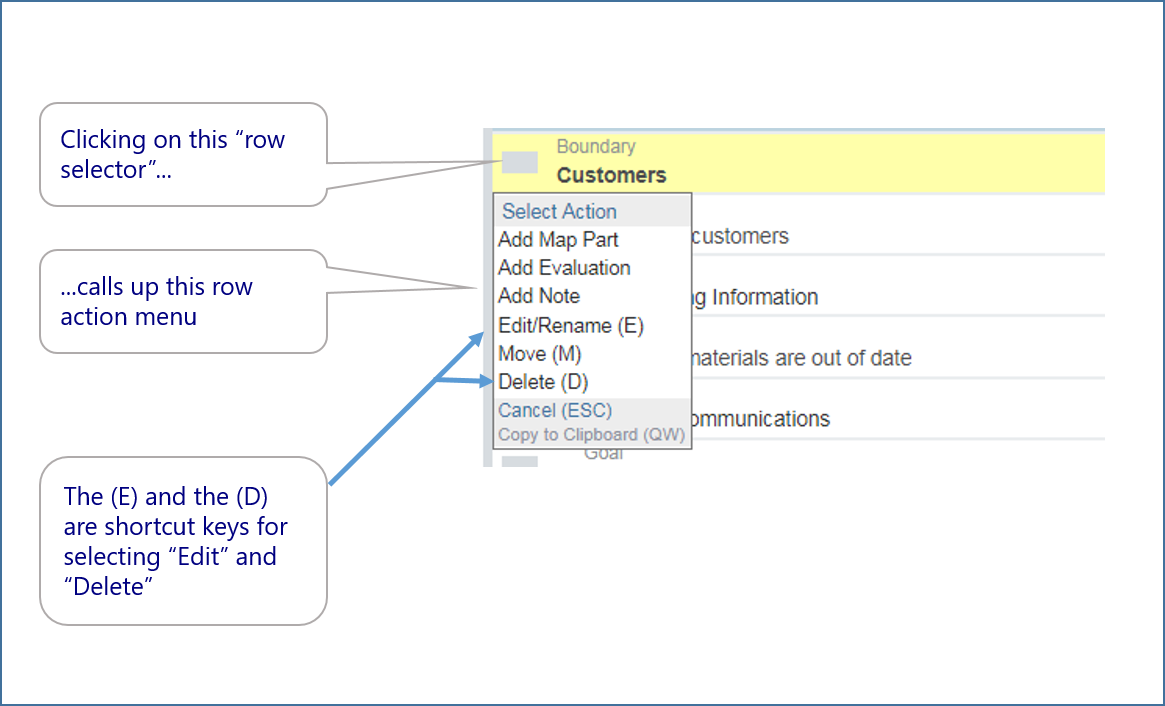
▪ Row menus are activated by clicking on the row selector of the item of interest.
Example of Row Selectors
Three Types of Row Menus
There are three types of row menus. They are generally used in this sequence:
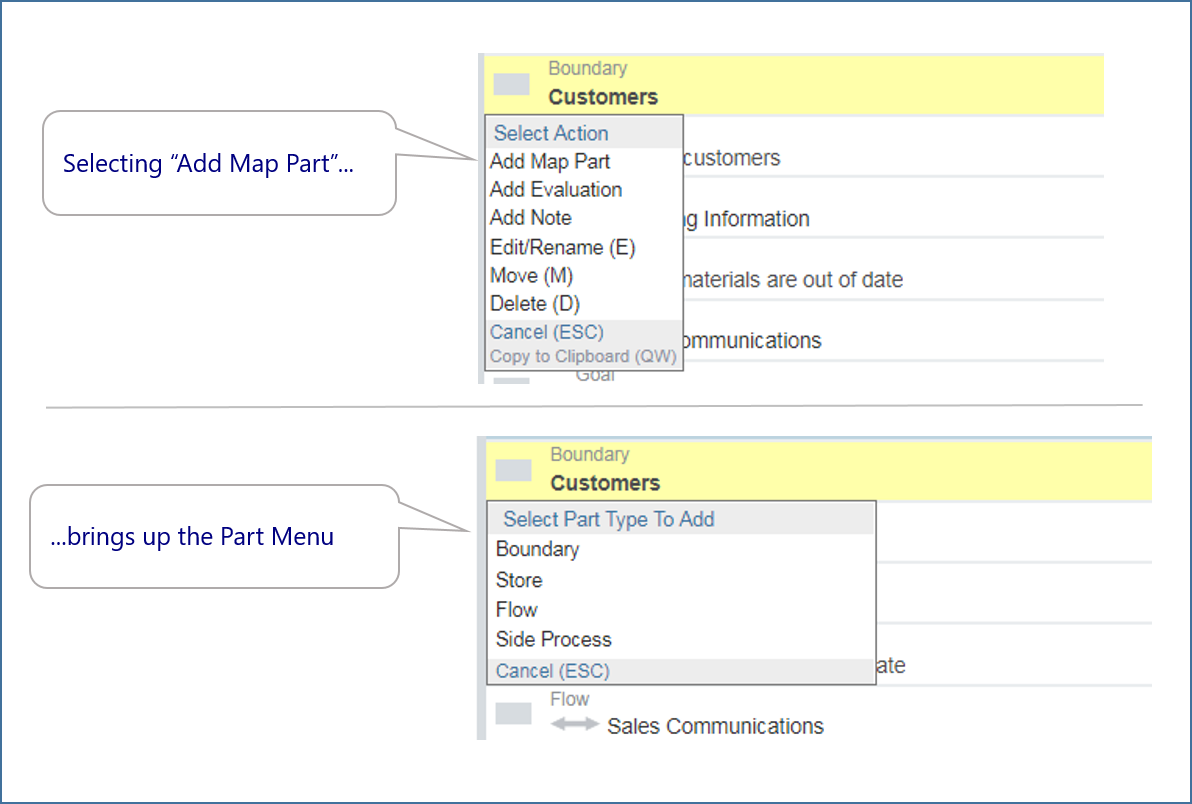
▪ Action Menu: shows the actions you can take - "Add", "Edit", "Move" and more
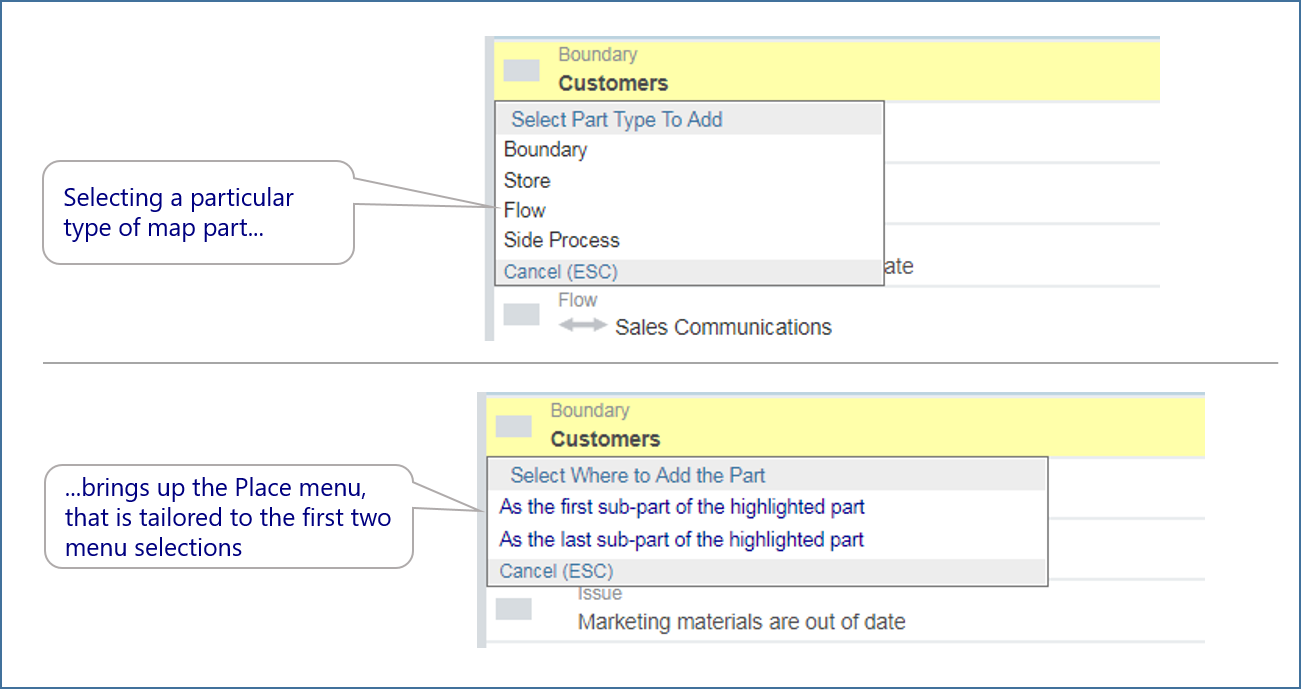
▪ Part Menu: lets you select the type of Map part or Plan part to add
▪ Place Menu: identifies the relative placement of a part that is being added or moved
In certain cases where there are limited choices, one or two of the row menus will be skipped
NOTE:
▪ All three types of row menus and associated actions are customized "on the fly" for different combinations of:
▪ initial row selection
▪ following menu selections
▪ second row selection
▪ There are dozens of combinations, too many to document here.
▪ The software provides the correct row menus when they are needed, along with action instructions right on the page.
▪ The examples below show some of the more widely used combination of row menu selections and actions.
▪ Learning this general pattern can be applied to all of the different cases.
Pressing the "Escape" key (ESC) will close any of these row menus.
ESC can also be used to cancel row menu actions that are in progress, such as adding, editing or moving a row.
Action Menu - Example
|

|
Copy to Clipboard Function
|

Part Menu - Example
|
|
Place Menu - Example |
Again, all of the above menus are tailored by the software based on:
▪ the current Session Activity
▪ the initially selected row part type
▪ the previous menu selections
Add and Edit Rows
| ▪ If Add or Edit is selected, an "add/edit row" like the one shown below is added to the List, to allow you to enter information. |  |
More Detail on the Add/Edit Row
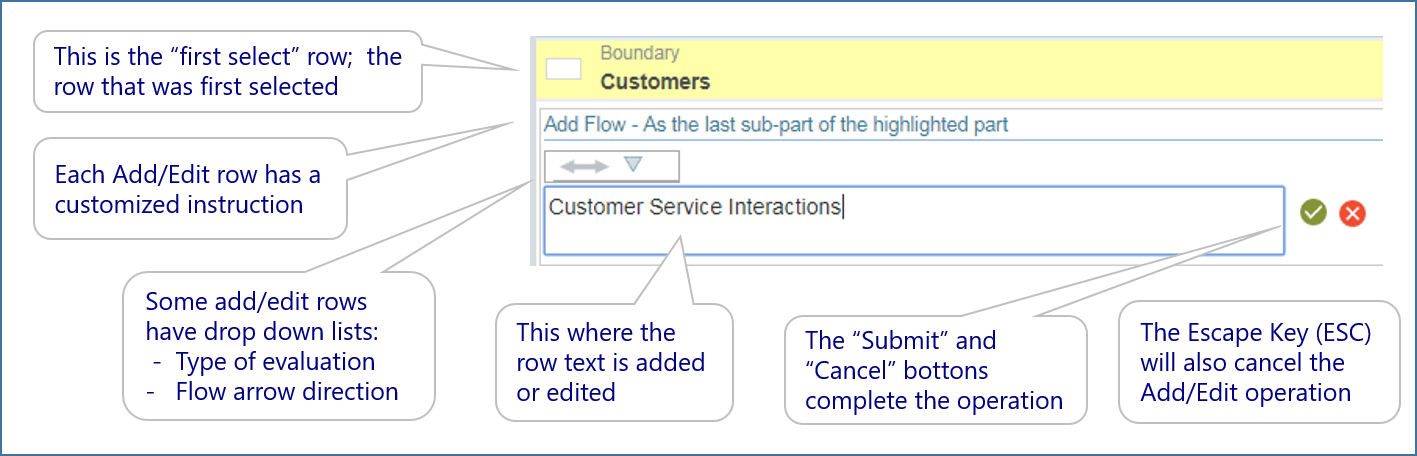
Note: the Tab Key and Tab+Shift keys will move the cursor back and forth through the text field and buttons of the Add/Edit Row.
When the "Submit" or "Cancel" Buttons are selected with the Tab, the Enter key will cause the action.
"Up" and "Down" arrows on the keyboard will select from the Drop Down List for Evaluations.
The Drop Down List for Flow Type must be selected manually.
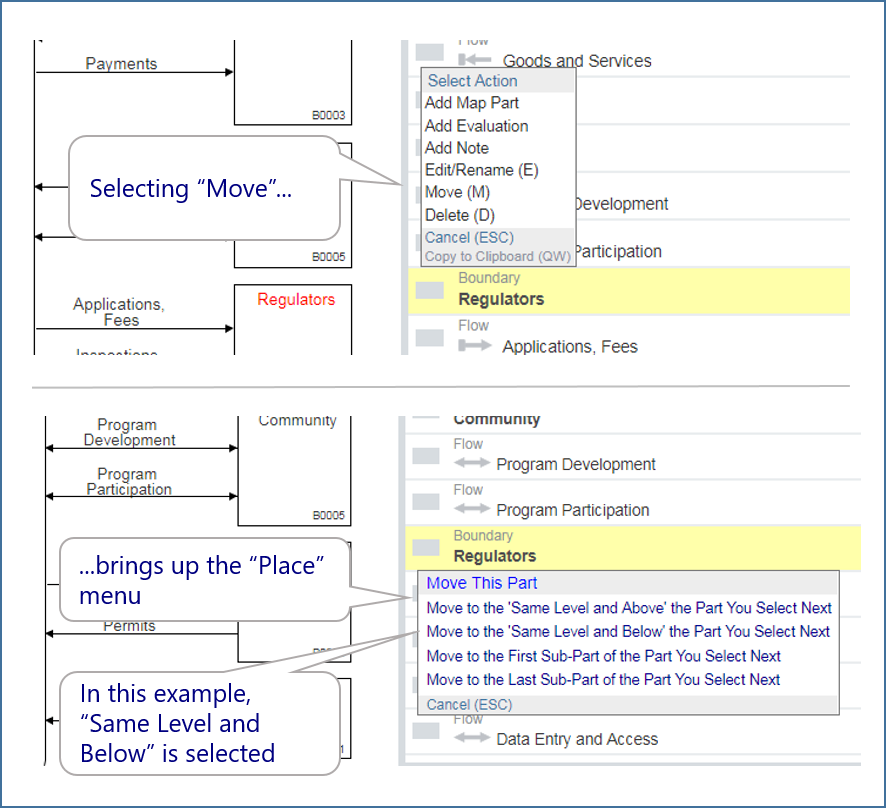
Move Parts
▪ Move is used to re position Map Parts and certain Plan Parts.
▪ If "Move"is selected from the Action menu, the next menu will be the "Place" menu, asking where to move the selected part to, relative to the next row that is selected.
Choices in the "Move Part" Place Menu
▪ The choices in the move place menu can be:
▪ Move to the Same Level and Above the Part You Select Next
▪ Move to the Same Level and Below the Part You Select Next
▪ Move to the First Sub Part of the Part You Select Next
▪ Move to the Last Sub Part of the Part You Select Next
Notes:▪ The term "level" in the above refers to "level in the List outline" |
 |
Then you are asked to select the location of the part that the move is relative to. |
Note:In the software this is referred to as the "second selection"; there is no need to remember or use that particular term in operating Sessions. |
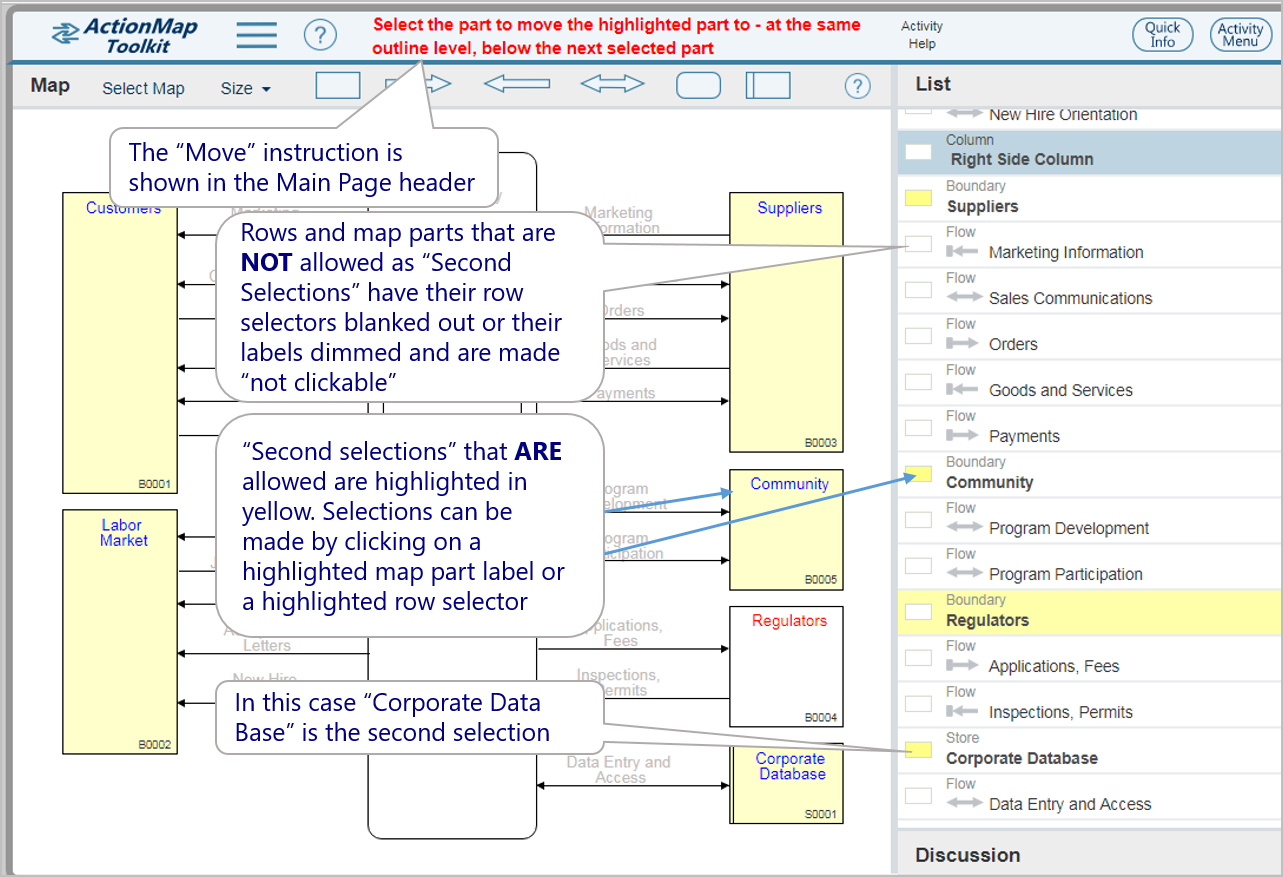 |
Note: Second selection actions can be cancelled by pressing the Escape key (ESC).
|
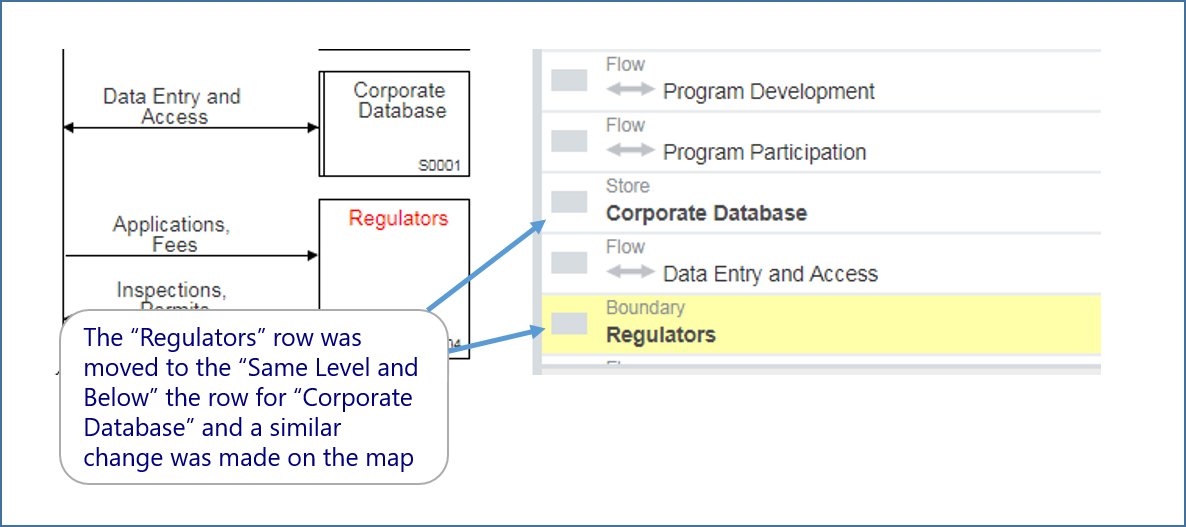
The image shows the result of the move when "Corporate Database" is the "second selection":
Note: |
▪ To repeat, all three types of row menus and actions are customized for each combination of Activity, first row selection and part type selection (if any). |
Special Move and Copy Actions in Planning Stage
Certain special types of Move and Copy actions are used in the Planning Stages.
▪"Create Proposed Change and Move This to It"
(Create a Proposed Change and Move a High Priority Evaluation to It)
▪ "Create a Proposed Change and Copy This to It"
(Create a Proposed Change and Copy a High Priority Evaluation to It)
▪ "Remove from Proposed Change"
(Remove a High Priority Evaluation from a Proposed Change)
▪ "Create an Action Item and Move This to It"
(Create an Action Item and Move a Proposed Change to It)
▪ "Create an Action Item and Copy This to It"
(Create an Action Item and Copy a Proposed Change to it)
▪ "Remove from Action Item"
(Remove a Proposed Change from an Action Item)
Details on these actions are shown under the Activities where these are used.
To repeat, all three types of row menus and actions are customized for each combination of Activity, first row selection and part type selection (if any).
Suggested Next Pages
Vote to Prioritize Evaluations and Proposed Change Actions
Map Drag and Drop
ActionMap "How It Works" Video
Help Table of Contents
Comments
To add or view comments about this article please go to the forum post at this link.
Comments
0 comments
Article is closed for comments.