Contents of This Page
Please note: a video overview of How to Use Stages and Activities is available at this link.
This page describes all of the Main Cycle Activities and can be linked to below:
Main Cycle Activities - Details
Capture/Edit Map and Plan Area Name
Capture/Edit Map Central Process Name
Capture Map Central Process Type
Capture Map Time Frame
Capture Map Filter/View Description
Capture Central Process Operators Description
Capture Change Drivers - Major Goals
Capture Change Drivers - Major Issues
Capture Change Drivers - Major Ideas
Capture Change Drivers - Major Change Ideas
Stage 1: Map - Add and Comment On Map Parts
Add/Edit/Comment On All Map Parts
Add Boundaries
Evaluate Boundaries
Add Stores
Evaluate Stores
Add Flows
Evaluate Flows
Add Sub-Processes
Evaluate Sub-Processes
Stage 2: Evaluate - Capture Evaluations
Capture Evaluations for All Map Parts
Stage 3: Prioritize Evaluations
Prioritize Map Evaluations
Batch Prioritize Map Evaluations
Capture Priority Cutoff for Map Evaluations
Stage 4: Capture Proposed Changes
Capture Proposed Changes
Capture Comments on Proposed Changes
Prioritize Proposed Changes
Batch Prioritize Proposed Changes
Capture Priority Cutoff for Proposed Changes
Capture Action Items for Proposed Changes
Organize Action Items
Capture Comments on Action Items
Capture Action Item Assignments
Capture Action Item Due Dates
End Toolkit Main Process
Work Product Construction Sequence in the Main Cycle
Main Cycle Activities - Details
Start Map and Plan Area
Capture/Edit Map and Plan Area Name
Purpose:
Provide a name for the Map and Plan Area (add and/or edit).
Definition:
The Map and Plan Area is the area of Activity or Process that is the general subject of the Session.
"Map and Plan" refers to the fact that the ActionMap Toolkit looks at this area in two major ways:
▪ as a relatively stable Activity ("Map") such as a current or future view of a department's operations, and
▪ as Activity that will be intentionally changed ("Plan").
For more detail on Map and Plan Areas see Work Products Overview.
Notes:
▪ The Map and Plan Area name can be edited by the Operator during any Mapping Activity.
▪ Session members may decide to change the name of the Map and Plan Area later in the Session if they find that their understanding of the Area has changed.
Action:
> "List" panel > "Area Name" row > Click on the row selector > Select "Edit/Rename" > Type in a phrase for the Map and Plan Area name.
Prompting Questions:
▪ "What is a name for the general area of Activity that we will be looking at in this Session?"
Capture/Edit Map Central Process Name
Definitions:
▪ The Central Process is the tall rounded rectangle in the center of the process Map.
▪ This is the specific Process/Activity area that will be the starting focus of this Session.
▪ The Central Process is also referred to the "Focus Process" for that reason.
Purpose:
Provide a name for the Central Process (add and/or edit).
Notes:
▪ The Central Process name can be edited by the Operator during any Mapping Activity.
▪ Session members may decide to change the name of the Central Process later in the Session if they find that their understanding of the process has changed.
Further guidelines
Naming the Central Process are provided at "Naming the Central Process".
Action:
> "List" panel > "Central Process" row > Click on the row selector > "Edit/Rename" > Type in a phrase for the Central Process.
Prompting Questions:
▪ "What is a name for the specific Activity or process that we will be focusing on in this Session."

Capture Map Central Process Type
Purpose:
Describe the general type of Activity that will be reviewed. This helps participants think about the relationship between the Central Process and the Boundaries (the graphics on the sides of the Map).
Options:
▪ The Central Process can be one of two general types:
1. A distinct separate operating process, Activity or entity with a clear inside and outside, such as a job, role, department, project, company or information system.
2. An area of interaction among entities, such as a negotiation, decision-making Activity, planning session and so on, that does not yet have a clear identification of inside and outside.
▪ The application provides about ten different variations of the first type to choose from.
▪ Choices also include "Other" and "Not Specified"
▪ Further Descriptions of the choices for Central Process Type can be found in "Naming the Central Process".
Notes:
▪ The Central Process Type does not affect any other functions of the Toolkit; it is for information purposes only.
▪ If this Activity is skipped, or the central process type row is deleted by the Operator, the row will be re-added if the Activity is started later.
▪ The Central Process Type can be edited by the Operator during any Mapping Activity.
Action:
> "List" panel > "Central Process Type" row > Click on the row selector > "Edit/Rename" > Select an option for the Central Process Type.
Prompting Questions:
▪ "Is the Central Process a distinct process or organization with recognized Boundaries, or is it more of an open-ended Activity where different people or groups interact?"
▪ "Which of the choices in this drop down List best reflects the type of process that we will be focusing on"
Capture Map Time Frame
Purpose:
Capture the time frame that will be used in thinking about the Central Process for this Map. This increases focus on the specific process that is being reviewed.
Description:
The Central Process and all processes under it in the Map are viewed in one of these Time Frames:
▪ "Past", the way that the process worked at some point in the past
▪ "Current", the way the process works now (aka "As Is")
▪ "Future", the way the process will work after changes occur (aka "To Be")
▪ "Current/Future Exploration" state, a mix of current and future (see notes below)
▪ "Plan", indicating the Map describes a Plan
Notes:
▪ The selection of time frame does not affect any other functions of the Toolkit; it is for information purposes only.
▪ "General" is used to indicate that this is a primarily a present state Map, in which some future improvements are shown.
▪ "General" can be further explained in a note or on the Filter/View row, in the next Activity.
▪ The specific scenario of "Past" can be indicated using the "Filter/View" row.
▪ The Time Frame can be changed by the Operator during any MappingActivity.
▪ If this Activity is skipped, or the Central Process Type row is deleted by the Operator, the row will be re-added if the Activity is started later.
Action:
> List > Time Frame Row > Click on the row selector > Edit/Rename > select from the drop down list
Prompting Questions:
▪ "What is the time frame of the Activity represented by the Central Process (see drop-down selections)?"
Capture Map Filter/View Description
Purpose:
Provide a description of a particular view, "slice" or sub-set of the Activity represented by Central Process, that will be looked in this Session. The Filter/View is used to limit the scope of the review to certain content.
Examples:
"Main Operations" (versus Management or Supporting Functions), "Financial Transactions", "Major Customer Transactions", and so on.
Notes:
▪ The Filter/View does not affect any other functions of the Toolkit; it is for information purposes only.
▪ The Filter/View row can be edited by the Operator during any Mapping Activity.
▪ If this Activity is skipped, or the Filter/View row is deleted by the Operator, the row will be re-added if the Activity is started later.
Action:
> "List" panel > "Filter View" row (under the Central Process line) > Click on the row selector > Select "Edit/Rename" > Type in a phrase for the Filter/View description.
Prompting Questions:
▪ "Is there a particular sub-set, filter or view of the Central Process Activity that we want to use in this Session? For example, do we want to look at the entire process, or just the major operations, or just the financial transactions, and so on?"
Capture Central Process Operators Description
Purpose:
Provide a description for the person or group that is inside the Central Process and causing it to operate (if any, and if known). This helps participants distinguish between the Central Process and the Boundaries.
Discussion:
▪ The "Operators" row is used to provide a general description of the people, departments or other "agents/actors" that are inside the Central Process.
▪ Examples are: "Department Staff", "Project Team Members", "Server Farm", and so on.
▪ This row should be considered a guideline; the same agents/actors can also be in Boundaries, if they have two different roles, for example, one role as performing the Central Process functions (so being an "operator", another role as sending and receiving information to and from the Central Process (so being a Boundary).
▪ This row can be combined with the "Filter/View" row to limit the scope of the review to certain content.
Notes:
▪ The Operators description not affect any other functions of the Toolkit; it is for information purposes only.
▪ The Operators row can be changed by the Session Operator during any Mapping Activity.
▪ If this Activity is skipped, or the Filter/View row is deleted by the Operator, the row will be re-added if the Activity is started later.
Action:
> "List" panel > "Operators" row (under the Central Process line) > Click on the row selector > Select "Edit/Rename" > Type in a phrase for the Operators description.
Prompting Questions:
▪ "Is there a particular person or group of people that are the primary drivers of the activity represented by the Central Process?"
▪ "Who is inside the Central Process making it operate?"
Capture Change Drivers - Major Goals
People Factor:
This Activity and the next two activities allow participants to express subjective information about why the Session is being held. They address people's need to understand that the meeting is important and worth their time.
Note:
Major Goals, Issues and Change Ideas should refer to changes in the operating process as opposed to goals for the development or improvement effort (unless of course the Central Process is Plan.)
Purpose of this Activity:
Record positive high level motivations for working on the process, that are known at this point in the Session.
Guidelines:
▪ Add 3 to 5 major goals for the Central Process.
▪ "Goals" are things people want to move toward. They are desirable outcomes and end states that are the result of change to the Central Process.
▪ Focus on conditions that people want to exist when the change is complete.
▪ Avoid phrasing Major Goals as "remove problem" or "do this about it".
▪ Those thoughts can be expressed in the next two activities.
▪ This Activity is designed to capture Major Goals early in the Session,
a) to set the general direction for the Session, and
b) to capture the group's view before doing further analysis of the Map Central Process.
▪ Limit the number of Major Goals to keep them high level. They will be prioritized later.
Action:
> List panel > Central Process row > Click on the row selector > "Select Add Evaluation" > Type in a phrase for a Major Goal
Prompting Questions:
▪ "What are 3 to 5 major goals for changing the process we are focusing on?"
▪ "What are new conditions that we would like to see when the changes are completed?"
Capture Change Drivers - Major Issues
People Factor:
(See "People Factor" in "Capture Change Drivers - Major Goals" above.)
Purpose:
Record negative high level motivations for working on the process, that are known at this point in the Session.
Guidelines:
▪ Add 3 to 5 Major Issues for the Central Process.
▪ Issues are things that people want to move away from.
▪ Issues are undesirable conditions that need to be changed or improved.
▪ Avoid including goals and change ideas here.
▪ Major Issues generally refer to business problems or challenges.
▪ This Activity is designed to capture these Major Issues early in the Session,
a) to set the general direction for the Session, and
b) to capture the group's view before doing further analysis of the Map Central Process.
▪ Limit the number of Major Issues to keep them high level. They will be prioritized later.
▪ Participants may also add and edit Major Goals during this Activity.
Action:
> "List" panel > 'Central Process' row > Click on the row selector > "Select Add Evaluation" > Type in a phrase for a Major Issue
Prompting Questions:
▪ "What are 3 to 5 major issues that are motivating people to look at this process?"
▪ "What are issues that we would like to see removed when the change is completed?"
Capture Change Drivers - Major Change Ideas
People Factor: (See People Factor in "Capture Change Drivers - Major Goals" above.)
Purpose:
Record high level ideas for changing the process, that are known at this point in the Session.
Guidelines:
▪ Add 3 to 5 major change ideas for the Focus, or "Central", Process.
▪ "Change Ideas" are ways to get from issues to goals. They are high level descriptions of possible courses of action.
▪ Focus on Action Plans for change; avoid phrasing Major Change Ideas as "remove problem" or "get to this milestone".
▪ Major Change Ideas often refer to approaches that are already under consideration, though "out of the box" ideas may be included.
▪ This Activity is designed to capture these Major Change Ideas early in the Session,
a) to set the general direction for the Session, and
b) to capture the group's view before doing further analysis of the Map Central Process.
▪ Limit the number of Major Change Ideas to keep them high level. They will be prioritized later.
▪ Participants may also and edit Major Goals and Major Issues during this Activity.
Action:
> "List" panel > 'Central Process' row > Click on the row selector > "Select Add Evaluation" > Type in a phrase for a Major Change Idea
Prompting Questions:
▪ "What are 3 to 5 Major Change Ideas that people have been talking about for this process?"
▪ "What are some Major Change approaches that are being considered for this process already?"
Comments
To add or view comments about the above section of this article please go to the forum post at this link.
Stage 1: Map - Add and Comment On Map Parts
Add / Edit / Comment On All Map Parts
Purpose:
Free form construction of the Map, for situations that do not benefit from the full Main Cycle sequence.
Description:
This Activity allows users to add, edit and move all Map Parts and add and edit Evaluations and Notes on any Map Part.
▪ This can be useful in personal work where you are exploring and learning the process, or looking for missing pieces or additional questions to ask.
▪ It can also be useful for groups that are more experienced with the application, to capture information quickly.
Action:
> "List" panel > Any row > Click on the row selector > Choose from pop-up menu items > Follow instructions on the Main Page Header and/or "blue line".
Notes:
▪ You can also activate the row menu for a Map Part in the List by clicking on the label for that part on the Map.
▪ You can cause the List item for the Map Part to scroll into view by double clicking on the Map Part label.
▪ The capability to add, edit and comment all Map Parts is available to the Operator during all Map building Activities.
Add Boundaries
Purpose:
Identify the people, groups, organizations and systems that interact with the Central Process.
Key Concept:
▪ It is important to capture all the Boundaries than may interact with the Central Process.
▪ The purpose of this is to create a "top down", "arms around the problem" view of the situation.
▪ Otherwise the group may go forward with an incomplete idea of what they are working on.
Guidelines:
▪ If the Central Process Type is a distinct process, then Boundaries are NOT sub-parts of the Central Process. They are OUTSIDE the Central Process, and they exchange information, money, goods and services with the Central Process.
▪ If the Central Process Type is an area of interaction, then the entities (people, groups, systems) inside the Boundaries may also perform some of the Activities inside the Central Process.
▪ A key purpose of Boundaries is to help define what is IN the Central Process, by defining what is NOT in the Central Process and what the Central Process interacts with.
▪ Boundaries are entities that are less controllable than the Central Process, or that the group does not intend to try to change during this process change effort.
▪ Boundaries are not "opened up" and examined in detail while working on a Map. That can be done later by making a Boundary the Central Process in another Map.
▪ It is a standard guideline to add no more than about seven Boundaries on either side of the Map page. Otherwise the Map becomes difficult to understand.
▪ Boundaries can represent high level collections of entities, such as "All Customers". At the same time other Boundaries on the same Map can be added for "Consumer Customers" and "Corporate Customers". The "All Customers" Boundary can be used to focus on what happens to all customers, while the others can be used to focus on things that only happen to those specific types of customers.
▪ A Boundary can be added for "Other Boundaries" in order to keep the number of Boundaries down.
▪ Boundaries can be added later if they are not captured on the first pass.
▪ There is no specific difference between Boundaries on the left side or right side of the Map, or toward the top or bottom of the Map.
▪ However, the group many decide to identify such meanings, e.g. left side for customers, right side for supplier, more important Boundaries toward the top, etc.
Further guidelines for thinking about Boundaries can be found at "Naming the Central Process".
Notes:
▪ All the previous Map building steps of are available during this Activity.
Action:
▪ > List > Click on the row selector for a column or "side part" (Boundary, Store, or side-process) > Select "Add Map Part" > Select "Boundary" > Select Placement > Type in the name of the Boundary, OR
▪ Click on a "side part" that is already on the Map, activating the row menu, OR
▪ Drag the Boundary icon from the Map Header onto the Map (see Map Drag and Drop).
Prompting Questions:
▪ "What is a person, group, organization or system that interacts with or through the Central Process?"
▪ "What are some other Boundaries?"
▪ "Are there any more before we move on? We can add more later, however, it would be good to get as many as we know about now."
Evaluate Boundaries
Purpose:
Capture interests, judgments, opinions and ideas about the Boundaries, by adding Evaluations and Notes to Boundaries.
People Factor - Going back and forth between adding parts and evaluating parts:
An important technique in ActionMap is alternating between capturing objective, analytic, thinking-based information and subjective, intuitive, feeling-based information.
▪ Too much objective analysis makes people bored.
▪ Too much subjective discussion leads to arguments.
Notes:
▪ All the previous Map building steps of are available during this Activity.
Action:
▪ Click on the row selector for the target Boundary > Select "Add Evaluation" or "Add Note" > Type in the text for that part type, OR
▪ Click on the Boundary on the Map, which causes the row menu to open
Prompting Questions:
▪ "What are Goals for interacting with this Boundary?"
▪ "What are Issues that occur in interacting with this Boundary?"
▪ "What are some ideas for changing the interactions with this Boundary?"
Add Stores
Purpose:
Identify major places where information and other resources are stored for use by the Central Process.
Guidelines:
▪ Stores are files, databases, containers, buildings, storage locations and other things that the Central Process uses to store information, money, goods or other resources.
▪ Stores are typically shown less often on "high level" process Maps, and are more often used on more detailed Map pages. On high level Maps, Stores are typically used to show only major databases or major files.
▪ A standard guideline is to use a Boundary instead of a Store to represent a complete information system.
Notes:
▪ All the previous Map building steps of are available during this Activity.
Action:
▪ > List > Click on the row selector for a column or "side part" (Boundary, Store, or Side-process) > Select "Add Map Part" > Select "Store" > Select Placement > Type in the name of the Store, OR
▪ Click on a "side part" that is already on the Map, activating the row menu, OR
▪ Drag the Store icon from the Map Header onto the Map (see Map Drag and Drop).
Prompting Questions:
▪ "What major places, tools or systems where information and other resources are stored for use by the Central Process?"
Evaluate Stores
Purpose:
Capture interests, judgments, opinions and ideas about the Stores, by adding Evaluations and Notes to them.
(See note above on "People Factor - Going back and forth between adding parts and evaluating parts" in "Add Boundaries" above)
Notes:
▪ All the previous Map building steps of are available during this Activity.
Action:
▪ Click on the row selector for the target Store > Select "Add Evaluation" or "Add Note" > Type in the text for that part type, OR
▪ Click on the Store on the Map, which causes the row menu to open.
Prompting Questions:
▪ "What Goals for interacting with this Store?"
▪ "What are Issues that occur in interacting with this Store?"
▪ "What are some ideas for changing the interactions with this Store?"
Purpose:
Identify specific interactions and transactions between the Central Process and Boundaries, Stores and side-processes.
Guidelines:
▪ Flows represent the actual movement of goods, money, services and so on between the Boundaries (or Stores) and the Central Process.
▪ Flows should not be used to mean "Go To" or "Do Next".
▪ Flows should ONLY represent the movement of "real stuff".
Notes:
▪ All the previous Map building steps are available during this Activity.
Action:
▪ > List > Click on the row selector for a "side part" (Boundary, Store, or side-process) > Select "Add Map Part" > Select "Flow" > Select Placement > Select the Flow direction > Type in the name of the Store, OR
▪ Click on a "side part" that is already on the Map, activating the row menu, OR
▪ Drag the a Flow icon from the Map Header onto the Map (see Map Drag and Drop).
Prompting Approach:
There are two major approaches to prompting for Flows.
▪ Per Boundary - in this case, all the Flows for a single Boundary are prompted for, before moving onto the next Boundary.
▪ In sequence - in this case, Flow are added to side parts in the sequence in which they occur during the process.
Key Concept:
▪ ActionMap diagrams are optimized to capture a view of the process in which the Flows may be happening in parallel.
▪ The purpose of that is to capture a "top down" understanding of the entire process, to see all of the possible resources and impacts, before drilling down into detail.
▪ This "parallel Activity" view is usually found on high level diagrams
▪ The "sequence view" starts to show up on lower level diagrams.
▪ ActionMap diagrams can represent sequence by adding sequence numbers to the flow descriptions.
▪ In the ActionMap team's experience with hundreds of engagements, sequence numbers have only occasionally been used.
Prompting Questions:
▪ "What happens first?"
▪ "What happens next?" {Ask repeatedly.)
▪ "Where does that go?"
▪ "Where does that come from?"
▪ "What is input to this Boundary / Store / Process?"
▪ "What is output from this Boundary / Store / Process?"
▪ "What triggers the Central Process to start operating?"
▪ "What is the last thing the Central Process does?"
▪ "What inputs are necessary for these outputs?"
▪ "What outputs are produced from these inputs?"
▪ "Does this process have any other inputs or outputs?"
▪ "Is there anything else?" (Ask repeatedly.)
People Factor:
▪ In some cases the most useful way to maintain focus is to concentrate on understanding the interaction and Evaluations with one Boundary (or other type of side part) at a time.
▪ This can include the following sequence:
▪ After capturing all Boundaries:
▪ Going one Boundary at a time
▪ Capture all the Flows for that Boundary
▪ Then capture all the Evaluations for both the Flows for that Boundary and for the Boundary as a whole.
▪ This allows the group to maintain a close focus and "complete the picture" before moving on to the next Boundary (or other type of side part.)
Evaluate Flows
Purpose:
Capture interests, judgments, opinions and ideas about the Flows, by adding Evaluations and Notes to them.
(See note on "People Factor - Going back and forth between adding parts and evaluating parts" in "Add Boundaries" above)
Notes:
▪ All the previous Map building steps of are available during this Activity.
Action:
▪ Click on the row selector for the target Flow > Select "Add Evaluation" or "Add Note" > Type in the text for that part type, OR
▪ Click on the Flow on the Map, which causes the row menu to open
Prompting Questions:
▪ "What are Goals for the performance of this transaction?"
▪ "What are measurements associated with this Flow?"
▪ (Measurements can be captured as Notes, or briefly in the Flow name.)
▪ "What are Issues that occur with this transaction?"
▪ "Any Issues with consistency, quality or reliability?"
▪ "What are some ideas for changing how this transaction operates?"
Purpose:
Identify major Sub-Processes or sub-activities within the Central Process. This expands people's understanding of the Central Process. It also the group to look into the Sub-Processes on separate Map Pages.
Guidelines:
▪ Sub-Processes "do the work" that occurs inside the Central Process.
▪ Sub-Processes handle the Flows that go into and come out of the Central Process.
▪ Sub-Processes should be named with verbs or verb phrases.
▪ It is preferred to NOT name Sub-Processes with nouns and noun phrases.
▪ Try to limit the number of Sub-Processes to about seven.
▪ See the guidelines for limiting the number of Boundaries in "Add Boundaries" above; they can be applied here as well.
Two important guidelines (not absolute rules):
▪ The set of Sub-Processes in a Central Process should completely "cover" the Activity within that Central Process.
▪ This means that anything that occurs in the Central Process should belong to a Sub-Process.
▪ Individual Sub-Processes should not overlap in terms of Activity with other Sub-Processes in the Central Process.
▪ This means that anything that occurs in the Central Process should belong to ONLY ONE Sub-Process.
Tips and Techniques:
▪ First, while adding Sub-Processes it is helpful, it is not necessary.
▪ A great deal of value can be produced with only a single Map with no Sub-Processes.
▪ At the same time, adding Sub-Processes is important if Sub-Process Maps are going to be part of the effort.
▪ AND, Sub-Processes can help prompt for Evaluations that may be important in creating the Session Action Plan.
▪ In most cases the set of Sub-Processes is clear based on the context of the situation.
▪ In the ActionMap team's experience, most Sessions require a certain amount of discussion and exploration before arriving at a satisfactory set of Sub-Processes.
▪ There is no "simple, mechanical" way to identify the "right" set of Sub-Processes in the Central Process.
▪ There are many possible ways to divide the Central Process: function, organization, Boundary interaction, location, sequence, etc.
▪ Tips and techniques for dividing the Central Process can be found at this page: "Identify a Set of Sub-Processes".
▪ Process division is often by "trial and edit".
▪ A basic approach includes:
▪ Consider what the Central Process and Session is about, and see if one of the ways of division is "obvious" for the group.
▪ Start with a division into three Major Parts, and divide each of those into three parts; then recombine back to seven.
▪ This approach can be done by the operator with voice or chat input from the other participants.
▪ Use the Main Page Discussion panel to capture ideas before committing them to the Map and List.
▪ Use e-meeting tools to draft or sketch possible process divisions for Session attendees to consider.
Notes:
▪ All the previous Map building steps of are available during this Activity.
Action:
▪ > List > Click on the row selector for a the Central Process > Select "Add Map Part" > Select Placement > Type in the name of the Sub-Process, OR
▪ Click on a Sub-Process that is already on the Map, activating the row menu, OR
▪ Drag the Sub-Process icon from the Map Header onto the Map (see Map Drag and Drop).
Prompting Questions:
▪ "What are some major activities that occur inside the Central Process?"
▪ "How could we divide the Central Process into three major activities?"
▪ Examples: input, process, output; beginning, middle, end; sub-organization; location; relationship with Boundary
Evaluate Sub-Processes
Purpose:
Capture interests, judgments, opinions and ideas about the Sub-Processes, by adding Evaluations and Notes to them.
(See note on "People Factor - Going back and forth between adding parts and evaluating parts" in "Add Boundaries" above)
Notes:
▪ All the previous Map building steps of are available during this Activity.
Action:
▪ > List > Click on the row selector for the target Sub-Process > Select "Add Evaluation" or "Add Note" > Type in the text for that part type, OR
▪ Click on the Sub-Process on the Map, which causes the row menu to open
Prompting Questions:
▪ "What are Goals for the performance of this Sub-Process?"
▪ "What are Issues that occur in performing this Sub-Process?"
▪ "What are some ideas for changing how this Sub-Process operates?"
Comments
To add or view comments about the above section of this article please go to the forum post at this link.
Stage 2: Evaluate - Capture Evaluations
Evaluate - Capture Evaluations for All Map Parts
Purpose:
Capture interests, judgments, opinions and ideas for all Map parts.
Notes:
▪ All Map parts can be added, moved and editing during this Activity
▪ Notes can also be added and edited during this Activity
▪ This Activity serves as a "last review and capture" for any Evaluations and Notes that were not captured in earlier activities.
People Factor:
▪ As described elsewhere, Evaluations provide participants with a way to express their subjective judgments, interests, opinions, feelings and non-quantifiable experiential knowledge.
▪ There are three types of Evaluations:
▪ Goals ("what to move toward")
▪ Issues ("what to move away from")
▪ Change Ideas ("things that might make a difference")
▪ Evaluations provide the motivation and direction for process change
▪ Evaluations are the starting point for a series of transformations that lead to action items:
▪ Evaluations
▪ Prioritized Evaluations
▪ High Priority Evaluations
▪ Proposed Changes that fulfill High Priority Evaluations
▪ High Priority Proposed Change
▪ Action Items that fulfill High Priority Proposed Changes
▪ Only Evaluations will be prioritized.
▪ Notes will continue to be part of the Map Area and will be exported in PowerPoint and Excel, however, they will not be prioritized and used as starting points for action.
Action:
> List > Click on the row selector for the target Map part > Select "Add" > Select "Add Evaluation" or "Add Note" > Type in the text for the selected part type.
Comments
To add or view comments about the above section of this article please go to the forum post at this link
Stage 3: Prioritize Evaluations
Prioritize Map Evaluations
Purpose:
Capture the group's assessments of the importance of Evaluations, for all Map Parts in a Map.
Notes:
▪ The purpose of prioritizing Map Evaluations is to focus attention on and select the Evaluations that participants want to advance toward Action Items, during the remainder of the Main Cycle.
▪ This Activity allows the user to capture one vote per Evaluation row.
▪ See the next Activity, "Batch Prioritize Map Evaluations" for capturing vote counts from many participants for each row.
Action:
▪ During this Activity priority vote buttons will be shown to the right of each Evaluation.
▪ Clicking on a priority vote button assigns that priority to that Evaluation.
▪ Priority Buttons and meanings:
▪ "A" = "Do this now"
▪ "B" = "Do this after the A's"
▪ "C" = "Do this later or not at all"
▪ "O" = Abstain
▪ Priorities are scored within the application using these values:
A = 6, B = 2, C = -1, Abstain = 0.
Prompting Questions:
▪ "How should we rate this Evaluation in terms of 'do next' priority?"
▪ "Is this something we should do now, do later, or maybe not do?"
Supporting Page:
Vote To Prioritize Evaluations and Proposed Changes
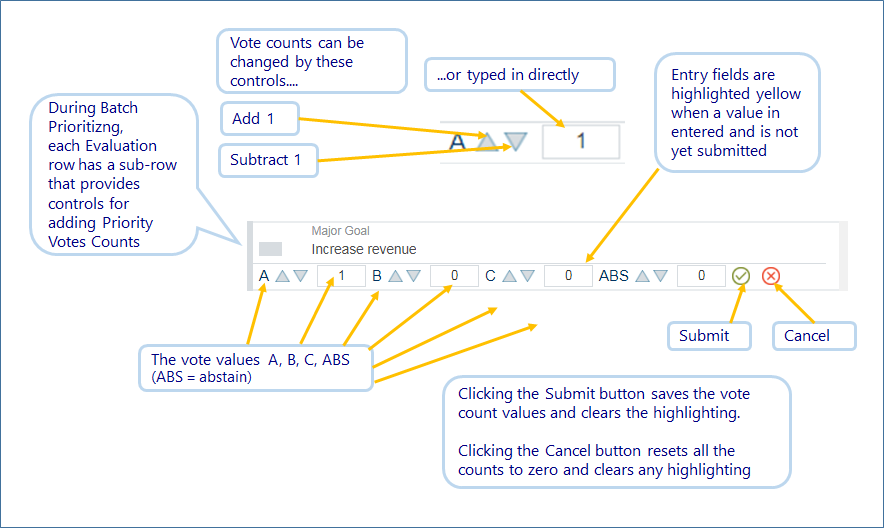
Batch Prioritize Map Evaluations
Purpose:
Provide the Operator with a way to enter priority vote counts from all participants, for Evaluations of a Map.
Explanation:
▪ During this Activity, Evaluations have entry fields for priority vote counts under them.
▪ This Activity is used to capture priority votes that are produced outside the software, such as by a raise of hands in a group Session, capture through "chat" during an e-Meeting, or a tabulation from a spreadsheet.
Action: See the illustration below.
Batch Prioritizing in progress:
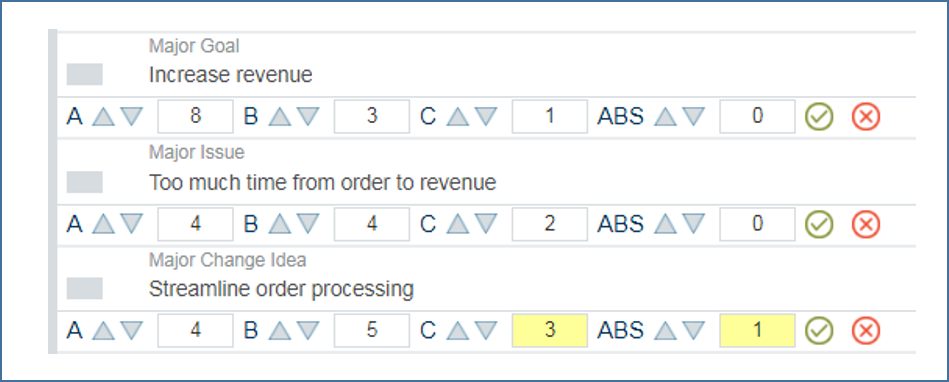
Note on mixing "Single Vote Prioritizing" versus "Batch Prioritizing"
- Adding Batch Priority counts will not cause a vote to appear on the associated row in the "Prioritize Map Evaluations" view.


- Selecting the A, B, C or O buttons at the right side of a row will add one vote of that type to the Batch Priority numbers.
- Because of this it is recommended not to mix "Single Vote" prioritizing with "Batch Prioritizing".
Capture Priority Cutoff for Map Evaluations
Purpose:
Capture participant choices for the Evaluations that should be included in going forward in the Session toward Action Planning.
Explanation:
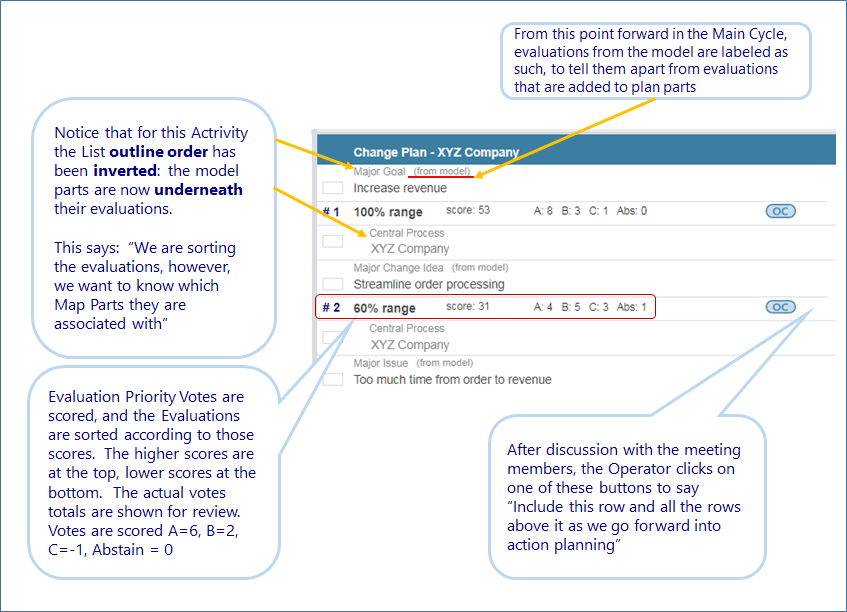
▪ During this Activity, Evaluations are sorted in descending priority sequence.
▪ The sort is based on a weighted score for the Evaluation, with priority A votes = 6, priority B votes = 2, priority C votes = -1 and Abstain votes = 0.
▪ The rows in the List are also rearranged so that the Map parts are now shown under the Evaluations (see image below.)
▪ Next to each Evaluation is a "Cutoff" button that participants can click to select that row as the "cutoff" row.
▪ "Cutoff" means "as we go forward into Action Planning, ignore all Evaluations below this row."
▪ The Operator has a special "OC" button (for "Operator Cutoff") that is used to make the final cutoff choice.
Action:
▪ After discussion with the group, click the "OC" button to finalize the cutoff selection and move to the next Activity.
▪ Clicking the "OC" button will produce a warning, and the operation can be accepted or cancelled.
▪ The Session can be returned to the "Cutoff" Activity at any time, to include more Evaluations.
Important Note: Change in List Sequence
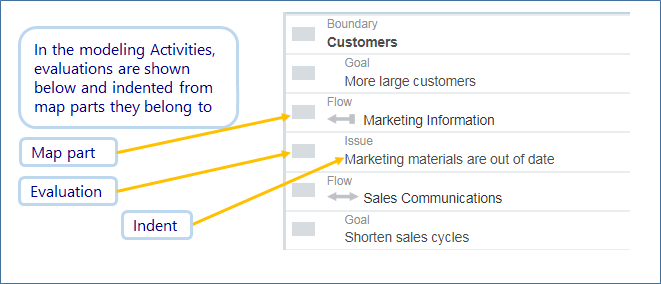
▪ When the Activity transitions to the "Capture Priority Cutoff for Map Evaluations" Activity, the parts are arranged in the List in a different sequence.
▪ As illustrated below, in the previous activities, Evaluations were shown as the "child" of the Map Part, indented and below the Map Part.
View in Mapping Activities
▪ In "Capture Priority Cutoff for Map Evaluations" the sequence is changed so that the Map Part is shown as the child of the Evaluation, indented and below the Evaluation.
▪ This puts the focus on the Evaluation, with the Map part showing where the Evaluation came from.
Note that:
- If an Evaluation is assigned to a Proposed Change in the next Activity,
- and the session goes back to the Cutoff Activity,
- then the Evaluation is no longer included in the "Cutoff" List.
That's because the Evaluation has already gone through the Cutoff once.
View in "Capture Priority Cutoff for Map Evaluations"
Prompting Questions:
▪ "What is the lowest Priority Evaluation that we should plan to work on now?"
Comments
To add or view comments about the above section of this article please go to the forum post at this link.
Stage 4: Capture Proposed Changes
Capture Proposed Changes
Supporting Links:
Please see "Functional Overview and Key Techniques" for another view of how to work with the Planning Stage Activities.
Stage Overview:
Up to this point, the group has:
▪ developed shared understanding of the objective situation by creating the Maps
▪ developed shared understanding of people's interests, concerns and ideas by capturing the Evaluations
▪ developed at least partial agreement on what is important in the situation by identifying the High Priority Evaluations
At this stage, the group begins to focus on more concrete steps that are:
▪ likely to make a difference and that
▪ might actually be taken.
Purpose of this Activity:
Use the High Priority Evaluations from the previous Activity as starting points for Brainstorming Proposed Changes that act on those High Priority Evaluations.
Explanation:
▪ Capturing Proposed Changes is a type of structureBd brainstorming.
▪ Proposed Changes are a partial step toward commitment to take action.
▪ They are "safe" in the sense that they are "Proposed", not required.
▪ Proposed Changes are stated in more "action-oriented" language than the type of Evaluation called a "change ideas".
▪ While Proposed Changes are one step closer to Action Items, participants should feel free to contribute any ideas that they believe may be helpful.
▪ Proposed Changes will be prioritized in a following Activity.
▪ Proposed Changes are like Evaluations in that they:
▪ do not need to be accepted by another participant, and
▪ the original contributor can block any edit changes to them.
▪ Notes can be added to Proposed Changes to provide explanations, suggestions or concerns about them.
Activity Overview (see illustrations below):
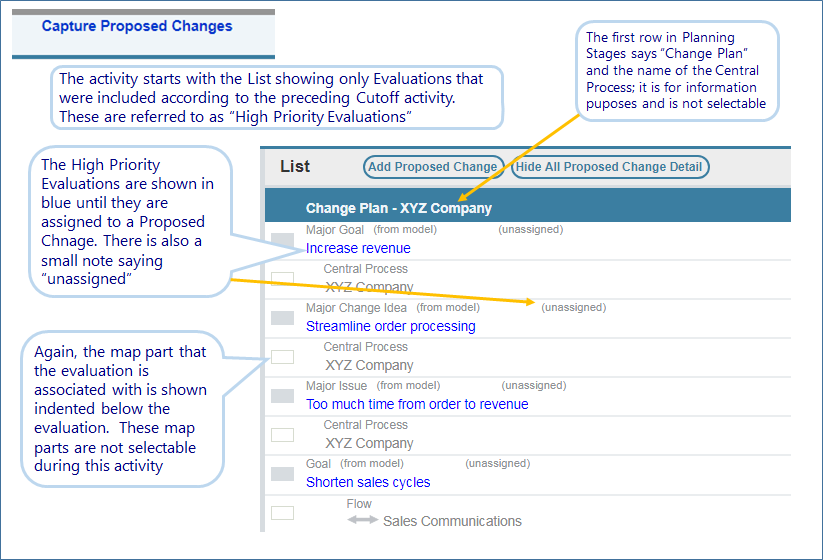
▪ At the start of this Activity the List contains all the High Priority Evaluations that are left after the cutoff vote from the previous Activity.
▪ The objective of this Activity is to add Proposed Changes and assign the High Priority Evaluations to them.
▪ There are specific row menu actions for doing this, described below.
▪ There can be more than one Proposed Changes for any one High Priority Evaluation.
▪ Because any Goal, Issue or Change Ideas might have multiple responses.
▪ While the High Priority Evaluations provide a structured focus for Brainstorming, Proposed Changes can also be added without reference to a High Priority Evaluation.
▪ That allows completely free-form Brainstorming.
Functional Goals of the Activity
▪ Identify Proposed Changes for all of the High Priority Evaluations.
▪ Capture any additional Proposed Changes that participants think of during the Activity, whether or not they are related to a High Priority Evaluation.
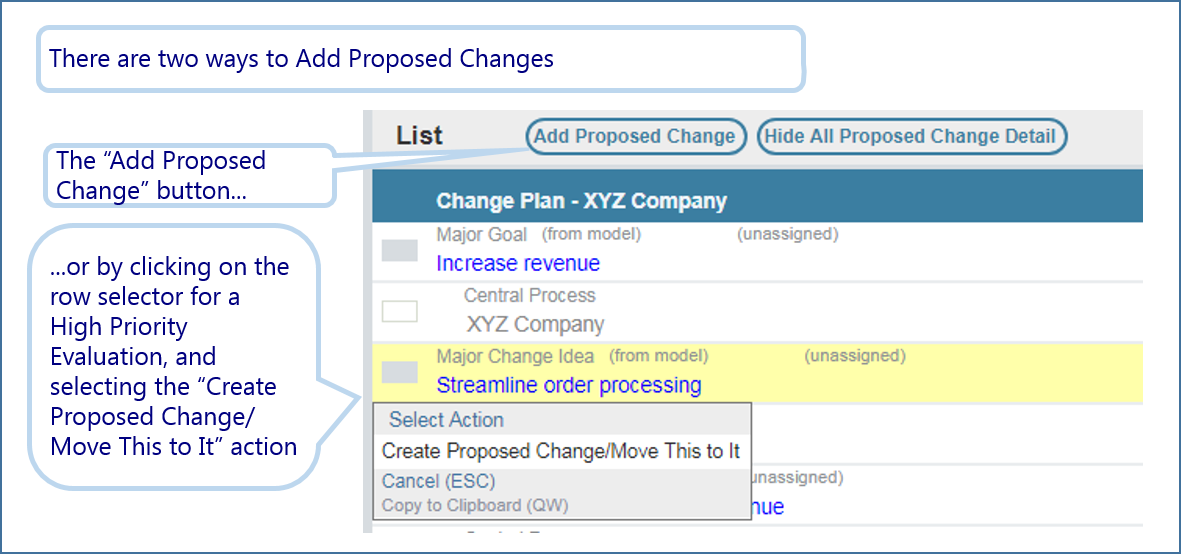
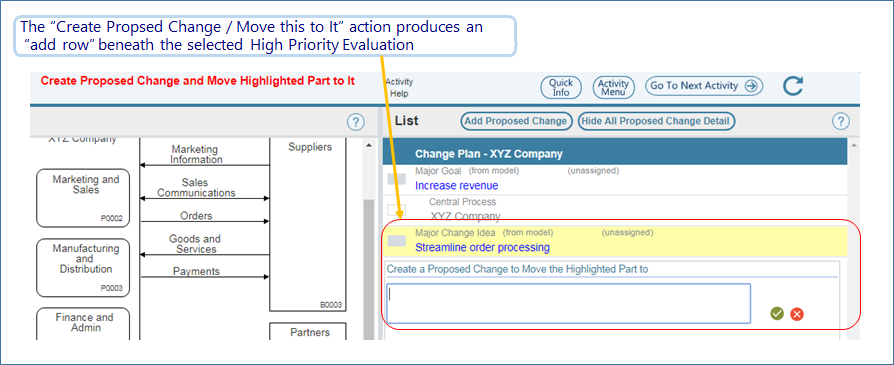
Creating Proposed Changes:
▪ Proposed Changes can be created in three ways:
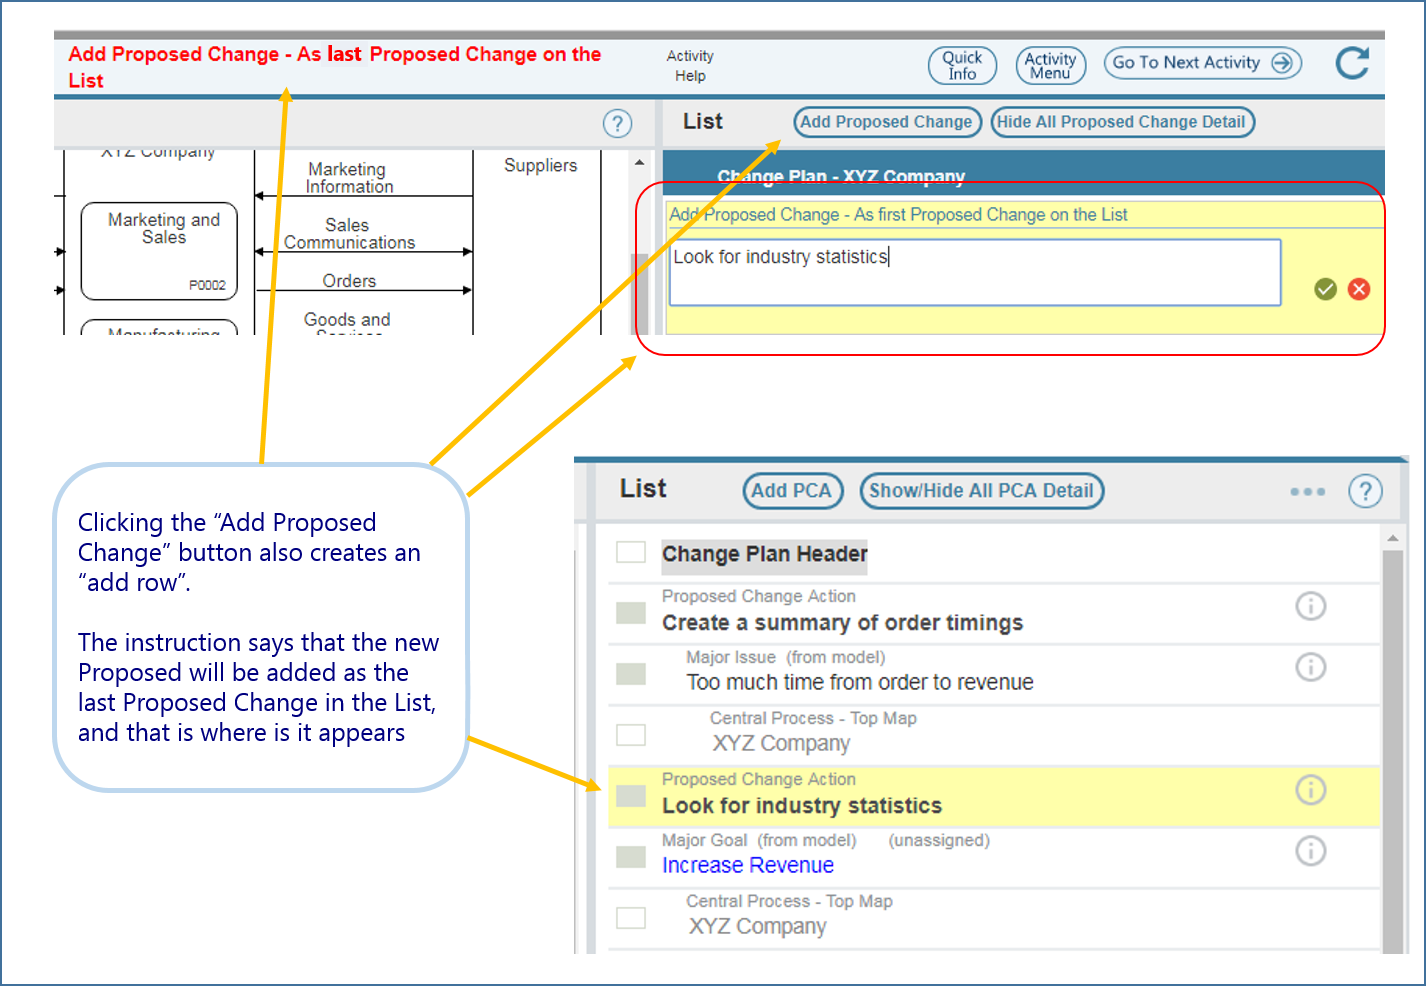
▪ By clicking on the "Add Proposed Change" button in the List header (this button appears during this Activity)
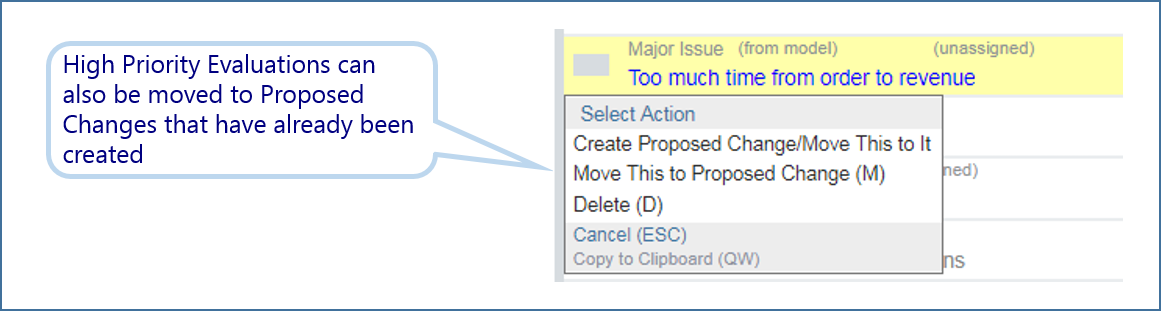
▪ By clicking on one of the High Priority Evaluation rows and selecting the row action "Create Proposed Change / Move this to it".
▪ By clicking on one of the High Priority Evaluation rows and selecting the row action "Create Proposed Change / Copy this to it".
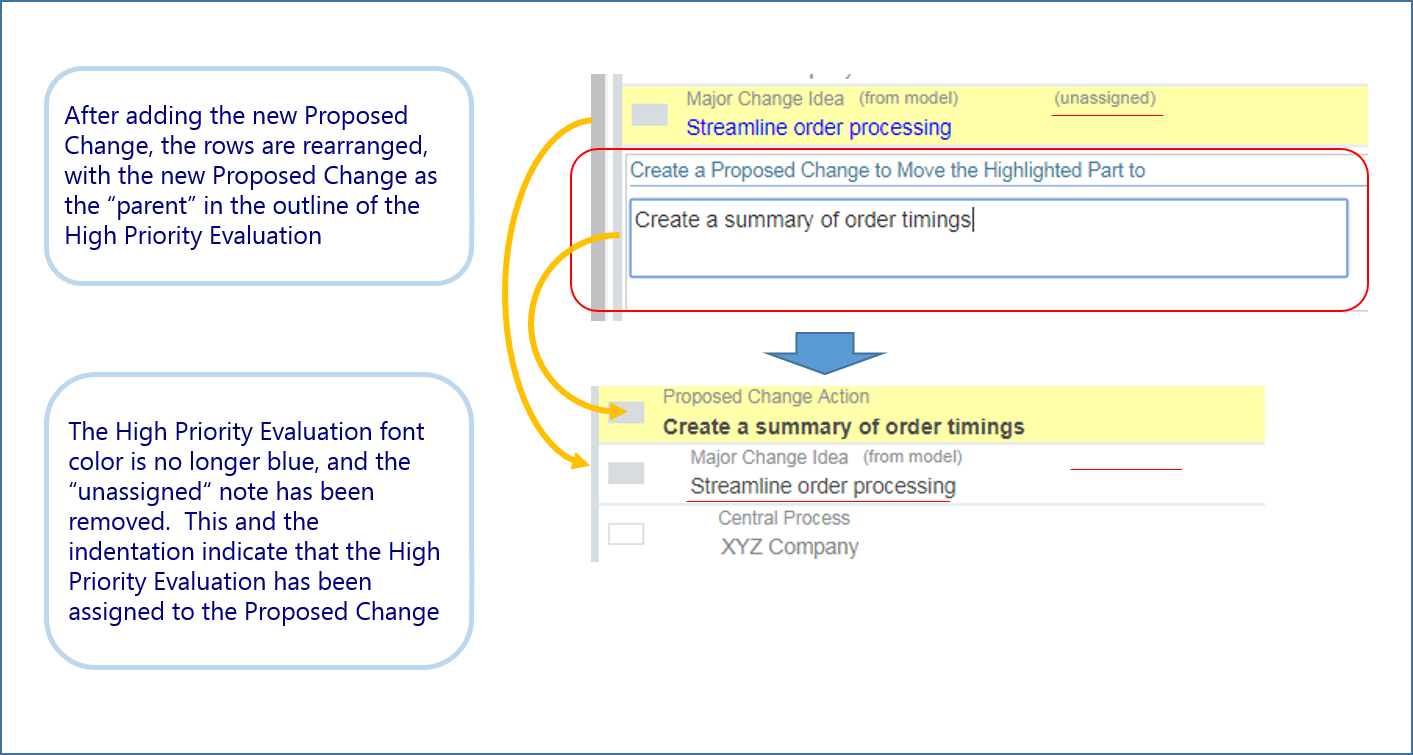
▪ All three actions creates an "add row", for typing in a description for the Proposed Change.
▪ Please see the images below for more detail on how to add Proposed Changes.
Prompting Questions:
▪ "What things could be done to respond to this High Priority Issue?"
▪ "What actions might be taken that would address that Goal?"
▪ "What are some ideas for Activities that would implement that Change Idea?"
Capture Proposed Changes - Starting View
How to Add Proposed Changes
Using the "Create Proposed Change / Move this to It" Action
Using the "Add Proposed Change" Button
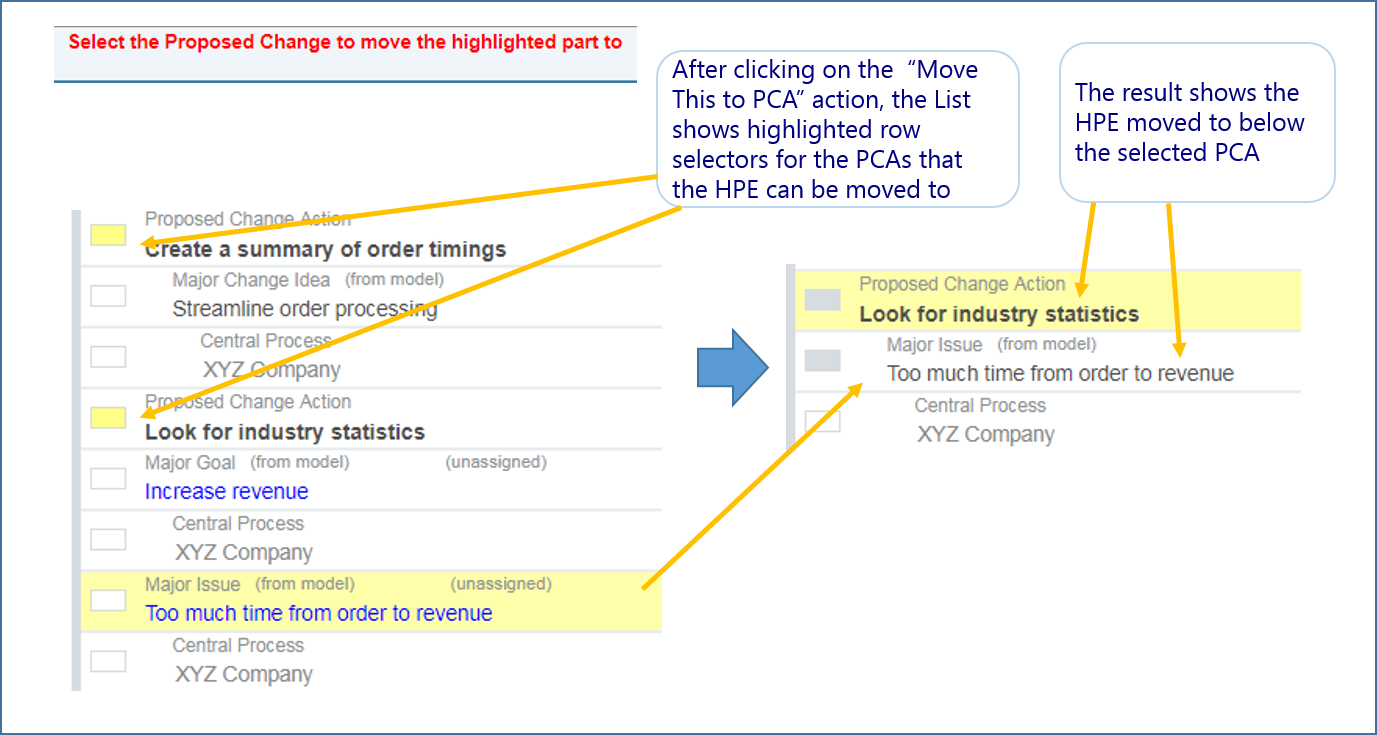
Moving High Priority Evaluations to Existing Proposed Changes
This behaves like the move Map Part functions, where the Proposed Changes that are allowed for the move are highlighted.
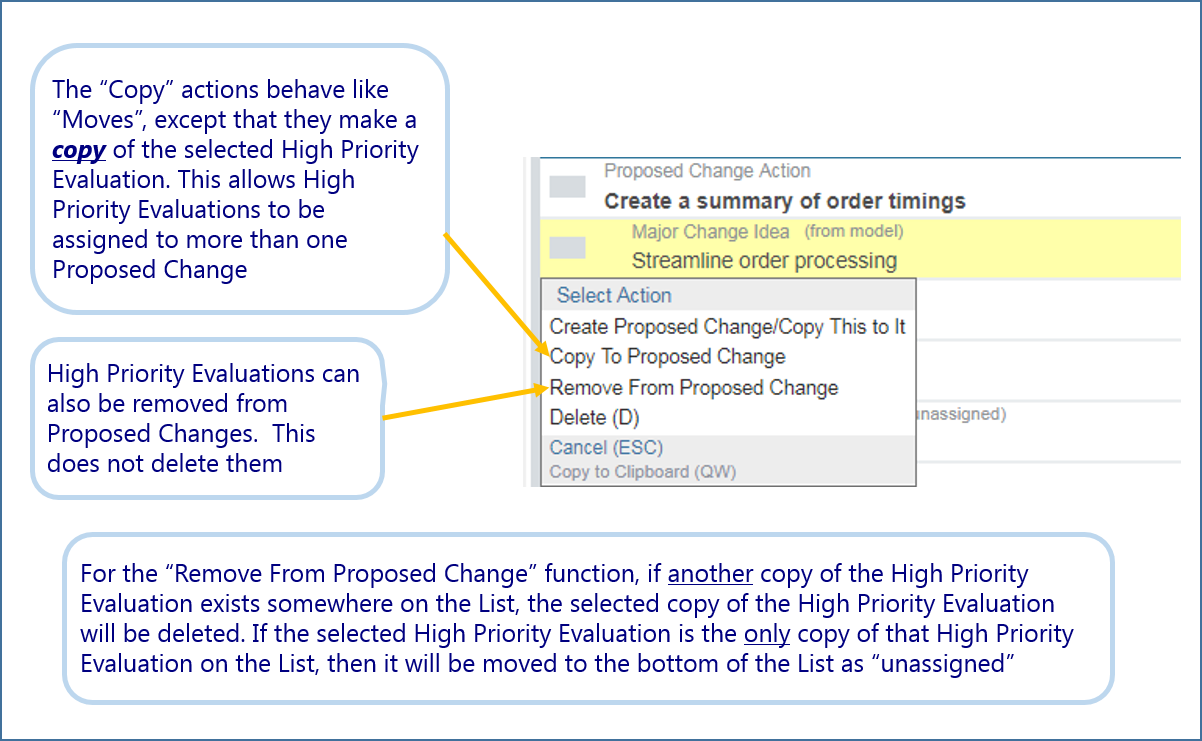
Copy and Remove Actions
The "Show/Hide All Proposed Change Detail" Button

More Notes on "Capture Proposed Changes"
▪ Again, the goal of the Activity is to assign all the High Priority Evaluations to at least one Proposed Change.
▪ Keep working on the List until that is accomplished, or it is decided that some High Priority Evaluations can be ignored
Important Note:
▪ At any time during the Planning Activities, the Session can:
▪ go back through the Mapping Stages
▪ capture more Evaluations
▪ Prioritize them
▪ perform the Cutoff operation on them
▪ and capture more Proposed Changes
▪ In doing that, none of the previous Proposed Changes other Planning Stage information will be lost
▪ The List can get a little complicated, with the possibility of Action Items mixed with Proposed Changes, however, all the parts will be clearly labeled and in the right sequence.
Capture Comments on Proposed Changes
Purpose:
Capture suggestions, concerns and details to Proposed Changes; Capture Notes for Proposed Changes.
Action:
Click on the row selector for the target Proposed Change > Select "Add Note" > Enter the text for the Note
Note:
Proposed Changes may also be added and editing during this Activity.
Prompting Questions:
▪ "What are suggestions, concerns or details that would increase understanding of this Proposed Change? "
Prioritize Proposed Changes
Purpose:
Indicate which Proposed Changes are most important for the current Map.
Explanation:
The purpose of prioritizing Proposed Changes is to focus attention on and select the ones that participants want to advance toward Action Items, during the remaining Main Process Activities.
Action:
▪ This follows the same pattern as "Prioritize Map Evaluations"
▪ During this Activity, Proposed Changes will have Priority vote buttons to the right of them.
▪ Click on a Priority vote button to assign that Priority to that Proposed Change.
Priority Buttons:
> "A" = "Do this now"
> "B" = "Do this after the A's"
> "C" = "Do this later or not at all"
> "O" = Abstain
Prompting Questions:
▪ "How should we rate this Proposed change in terms of 'do next' Priority?"
Supporting Page:
"Vote To Prioritize Evaluations and Proposed Changes"
Batch Prioritize Proposed Changes
Purpose:
Provide the a way to enter Priority vote counts for all Proposed Changes.
Action:
▪ This follows the same pattern as "Batch Prioritize Map Evaluations"; see that Activity for details.
Capture Priority Cutoff for Proposed Changes
Purpose:
Capture participant votes that indicate the lowest priority level for Proposed Changes that should be considered going forward in the Session.
Action:
▪ This Activity follows the same pattern as "Capture Priority Cutoff for Map Evaluations"; please see that Activity for details.
Prompting Questions:
▪ "What is the lowest Priority Proposed Change that we should carry forward into detailed Action Planning?"
Comments
To add or view comments about the above section of this article please go to the forum post at this link.
Stage 5: Create Action Plan
Capture Action Items for Proposed Changes
Stage Overview:
Up to this point, the group has:
▪ developed shared understanding of the objective situation by creating the Maps
▪ developed shared understanding of people's interests, concerns and ideas by capturing the Evaluations
▪ developed at least partial agreement on what is important in the situation by identifying the high priority Evaluations
▪ developed at least partial agreement on Activities that might be helpful by identifying High Priority Proposed Changes
At This Stage
The group creates the final elements that are needed to develop strong commitment to take action.
▪ well-defined Action Items
▪ assignments to specific people
▪ specific target due dates
Purpose of this Activity:
Capture specific "do-able" Action Items that can put High Priority Proposed Changes into effect. Contributing a "Proposed Change" means "I offer this suggestion of a potential idea for changing the situation".
Explanation:
▪ Action Items are clearly stated, concrete, "do-able" actions that appear to have these qualities:
▪ Important: this follows from the fact that Action Item being applied to a Proposed Change that has been filtered through two priority passes
▪ Feasible: It is possible to perform the Action Item with available or directly obtainable resources,
▪ Effective: it is likely that the Action Item will produce a desirable result in terms of causing the Proposed Change to happen
▪ Acceptable: the Action Item should not have side-effects that will be strongly objected to by stakeholders, such that the Action Item would either be prevented from being effective or do more harm than good.
▪ These qualities will be further determined by nominating Action Items, and then editing and annotating them, and finally, by assigning people and due dates to them.
▪ Action Items that do not have the above qualities are unlikely to be given assignments and due dates.
▪ Action Items are not Prioritized and selected with a Cutoff.
▪ The group should expect to perform the Action Items that are captured.
▪ Because of this, extra discussion of Action Items may be needed.
▪ Action Items can be put into a sequence during the next Activity, "Organize Action Items".
Action:
▪ This Activity follows the same pattern as "Capture Proposed Changes", with slightly different row menu items; please see that Activity for details.
Notes:
▪ If it is anticipated that the resulting Action Plan Outline will be highly complex, then the Session group should consider three other options:
▪ Use a "core" team to construct the Action Plan in the application, and then bring back the whole group to review and work on the result.
▪ Create another Map with Central Process Type = "Plan", and use it to discover and assemble the details of the Action Plan.
▪ Take the Action Planning Activity off-line for formal project management techniques.
Prompting Questions:
▪ "What are specific Actions that we can commit to taking that will move this Proposed Change forward?"
Organize Action Items
Purpose:
Move Action Items within the Change Plan List to put them in a particular sequence, indicating the order in which they should be performed.
Action:
▪ This follows the same pattern of Activity as "The 'Move Part' Action"; please go to that link for details.
▪ Exception: No Map graphics are involved in moving Action Items.
▪ Notes can also be added to Action Items during this Activity.
Prompting Questions:
▪ "How might we change the sequence of these Action Items for to increase understanding of how they are related to each other?"
Capture Comments on Action Items
Purpose:
Give participants an opportunity to contribute suggestions, ideas and concerns about the Action Items.
Action:
> List > Click on the row selector for the target Action Item > Select "Add Note" > Enter the text for the Note.
Note:
▪ Action Items may be added and edited during this Activity.
▪ Action Item Notes appear in a separate column in the Excel export format for Plans.
Prompting Questions:
▪ "What are suggestions, concerns or details that would help in performing this Action Item?"
Comments
To add or view comments about the above section of this article please go to the forum post at this link.
Stage 6: Assign and Schedule
Capture Action Item Assignments
Purpose:
Assign a specific person or persons to responsible for each Action Item.
Explanation:
▪ At the start of this Activity, the software adds an "Assign To" Note to each Action Item.
▪ If the Note is deleted it can be re-added through the row menu.
Action:
> List > Click on the row selector for the "Assign To" Note > Select "Edit" > Use the edit row to enter a description of who the item is assigned to
Notes:
▪ "Assigned To" Notes are free form text, and can be edited.
▪ "Assigned To" Notes appear in a separate column in the Excel export format for Plans.
Prompting Questions:
▪ "Who will take ownership of performing this Action Item?"
Capture Action Item Due Dates
Purpose:
Assign a specific Due Date for each Action Item.
Explanation:
▪ At the start of this Activity, the software adds a "Due Date" Note to each Action Item.
▪ If the Note is deleted it can be re-added through the row menu.
Action:
> List > Click on the row selector for the "Due Date" Note > Select "Edit" > Use the edit row to enter a description of the Due Date.
Notes:
▪ "Due Date" notes are free form text, and can be edited
▪ "Due Date" notes appear in a separate column in the Excel export format for Plans
Prompting Questions:
▪ "When should we plan to review progress on this Action Item?"
Comments
To add or view comments about the above section of this article please go to the forum post at this link
Purpose:
Ends the ActionMap Toolkit Main Cycle
Notes:
▪ This is for information purposes only
▪ The Session is still active until the Operator uses the "End Session" control.
Work Product Construction Sequence in the Main Cycle
Each Stage of the Main Process Creates a Specific Work Product.
After the Maps, each Work Product is constructed by:
▪ Reviewing preceding Work Products and
▪ Adding information that is associated with those preceding Work Products
This progression of Work Products is illustrated here:
Progression of Work Products (by Stage and major Activity)

Suggested Next Pages
Select Activity to Perform / Go to Next Activity
Work Products in Sessions: Create, Select and Change
Help Table of Contents
Comments
To add or view comments about the above section of this article please go to the forum post at this link.
Comments
0 comments
Article is closed for comments.